
One of the most popular types of grafting is called whip & tongue grafting. It is a method that involves the joining of a scion and a rootstock, and it is widely used to propagate fruit trees. The following are the 10 steps involved in whip & tongue grafting:
Step 1: Gather your tools and materials To perform a whip & tongue graft. Here’s a list of what you’ll need for a whip & tongue Graft:

- Alcohol Wipes or Soap/Water ($5)
- Grafting Knife ($16)
- Pruning Shears or Pruning Saw ($13)
- Rootstock of a Fruit Tree (Free)
- Compatible Scion Wood (about 7-inch length & 0.25-0.50-inch wide – Free)
- Parafilm or wrapping film ($7)
- Grafting Tape ($8)
- Cut Resistant Gloves ($10) Optional
Step 2: Choose the right time of year The best time to perform a whip & tongue graft is during the dormant season, which is usually in late winter or early spring. This is when the trees are not actively growing, and the scions and rootstocks are easier to work with.
Step 3: Cut the rootstock Use the pruning shears to make a clean cut on the rootstock at a 45-degree angle. The cut should be smooth and free of any jagged edges.
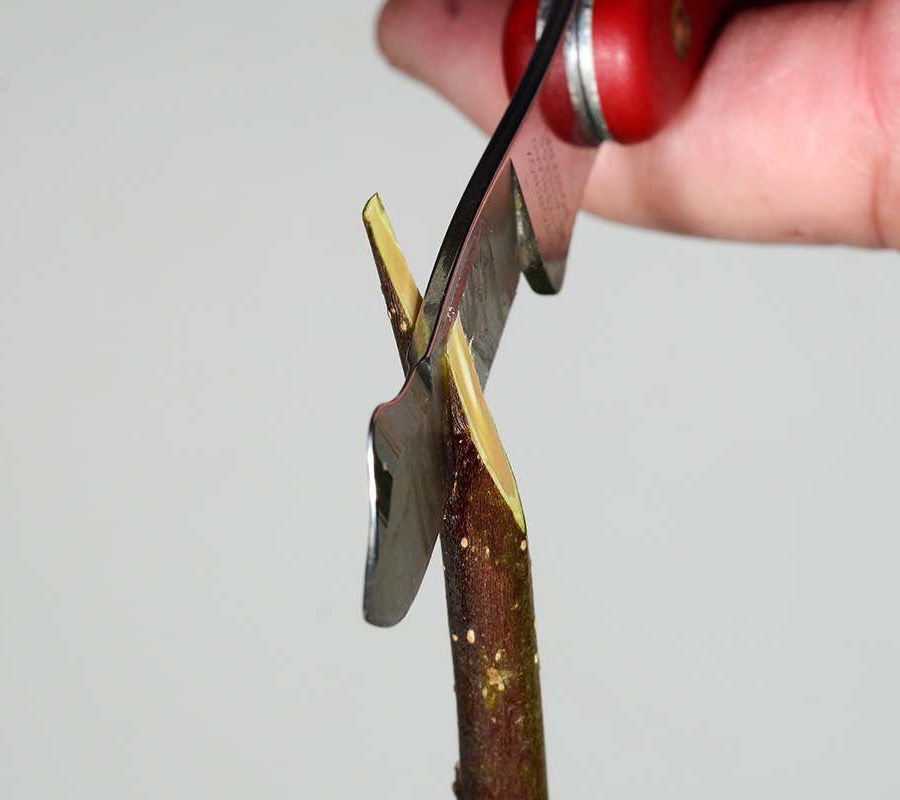
Step 4: Make a tongue cut Next, make a small tongue cut on the rootstock by cutting vertically through the center of the angled cut. The tongue should be about 1 inch long and should be in the center of the cut.
Step 5: Cut the scion Cut a healthy scion from a dormant branch of the desired plant at a 45-degree angle. The scion should be about 3 to 4 inches long and should have at least 3 buds.
Step 6: Make a whip cut On the scion, make a matching 45-degree angle cut that is exactly opposite to the one on the rootstock. This cut should be made about 1 inch below the lowest bud on the scion.
Step 7: Make a tongue cut on the scion Make a small tongue cut on the scion by cutting vertically through the center of the angled cut. The tongue should be about 1 inch long and should be in the center of the cut, just like the one on the rootstock.
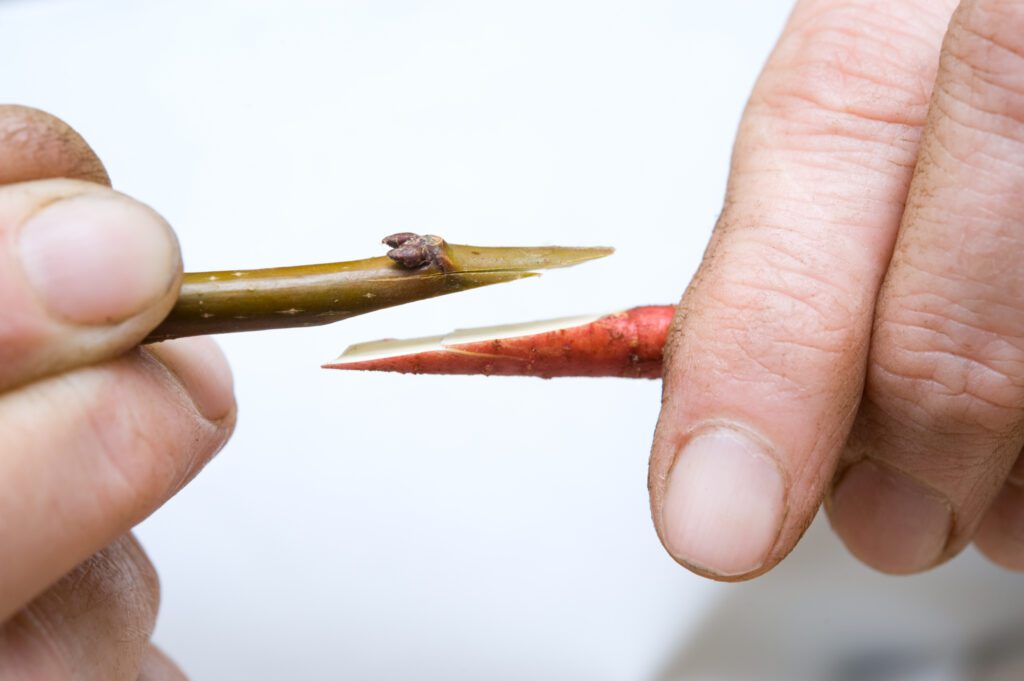
Step 8: Join the scion and rootstock Insert the tongue of the scion into the tongue cut of the rootstock. The two tongues should fit snugly together, and the cambium layers of the scion and rootstock should be in contact.
Step 9: Wrap the graft Wrap the graft tightly with grafting tape, making sure to cover the entire graft and the cut ends of the scion and rootstock. This will help hold the graft in place and prevent moisture loss.

Step 10: Apply a grafting sealant Finally, apply a grafting sealant to the graft to prevent moisture loss and to protect it from pests and disease. Be sure to follow the manufacturer’s instructions for best results.
Conclusion
In conclusion, whip & tongue grafting is a tried-and-true method for propagating fruit trees and other plants. While it may seem daunting at first, with practice and attention to detail, anyone can learn how to successfully perform a whip & tongue graft. By following these 10 steps, you’ll be on your way to growing healthy, productive trees for years to come.